Description
FOP2 Dialer is, as the name implies, a dialer component for your Asterisk® PBX, bundled as a FOP2 plugin for easy installation and administration via the FOP2 Manager.
The dialer is meant to be used on outbound dial campaigns. It is tightly integrated with IssabelPBX and similar configuration engines. The dialing modes available available are: automatic, preview and progressive.
For inbound campaigns you can use Asterisk queues directly.
For dynamic form or scripts, either for inbound or outbound campaigns, you might want to use the FOP2 Scripter plugin, that integrates tightly into the solution.
DISCLAIMER THIRD PARTIES
All product and company names are trademarks™ or registered® trademarks of their respective holders. Use of them does not imply any affiliation with or endorsement by them.
LINUX is the registered trademark of Linus Torvalds in the U.S. and other countries.
ASTERISK is a registered trademark of Digium, Inc.
ISSABEL is a registered trademark of Issabel, LLC.
License
The dialer license is a bit different from the FOP2 license itself, as it is not perpetual. License is valid for one year, and must be renewed every year. It does not have any limitation on the number of channels, simultaneous calls or agents. You need just one license per server/installation and it will fire all the calls it is configured to do, being the limit the hardware, network or asterisk capacity and features enabled on that server.
System Requirements
The FOP2 dialer plugin requires FOP2 version 2.31.20 or higher to be installed and running , with MySQL and PHP support (astlinux embedded platform cannot be used with this plugin as it lacks MySQL support).
The plugin is memory demanding, so expect FOP2 memory usage to double when enabling the plugin. It will also increase the CPU usage on the server a bit.
Installation
Installing the plugin is done the same way as any other FOP2 plugin. Log first into your FOP2 Manager via the admin url: http://your.server/fop2/admin , select the Plugins section and install the plugin from there. In order to be able to install the dialer, you must purchase a license first.
Once the plugin is installed, you must restart the FOP2 server from the command line with this command:
service fop2 restartBasic Settings
Using your browser, check the Settings button on the Dialer plugin. You will see basic configuration parameters, like the MySQL connection details that will be already filled in case you use IssabelPBX or a similar configuration engine. If not, be sure to set them up correctly and that the MySQL user selected has create permissions as the dialer plugin will create a number of tables on the selected database in order to function properly.
You will also find some other parameters that are already filled with sensible defaults, but you can change them in case of need, like:
- Dial Timeout
- Timeout in seconds for the Dial operation
- Dial Context
- Asterisk dialplan context to use when performing the outbound call
- Extensions Conf File
- The dialer will create some dialplan helper functions in order to work, you must specify the extensions.conf file you want to grant the dialer access to write such contexts. By default it uses extensions_custom.conf file that is the standard for custom configuration on IssabelPBX and similar systems.
- Preview Template
- For the preview dialer mode you can modify the dustjs based template to display to the agent on their panel display. There are some special variables to use: {NAME} to display the contact name if configured, {NUMBER} to show the number that is going to be dialed and the mandatory {DIALBUTTON|s} that will render a Button to initiate the call. If you do not include the dial button variable, the agent won't be able to start the call.
- Ok Disposition
- This is the Dial disposition that will be looked for to consider a call as completed successfully. Most probably you won't need to change it from the default 'ANSWER' value.
Dashboard
The dialer dashboard will display all configured campaigns with visual hints as to their status: active in green, inactive in yellow and expired in red.
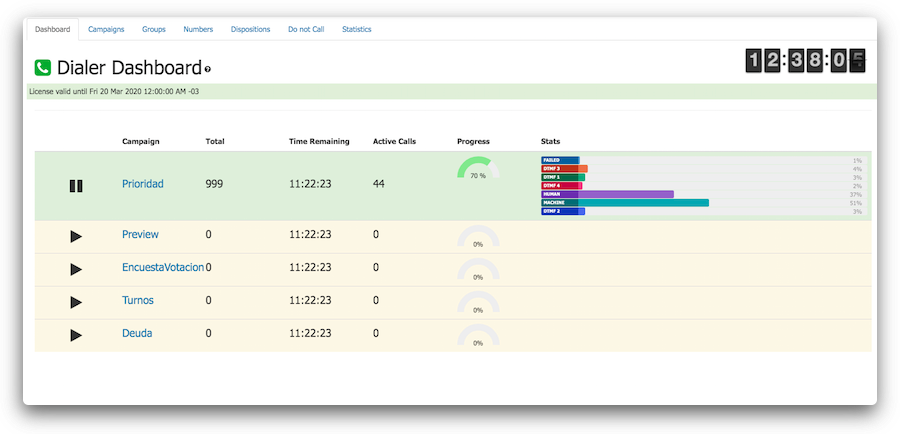
You will also see basic operation metrics, as the total number of entries in the campaign, the time remaining for the day, the number of active calls, and percent of call dispositions for operator, being 'Agent' calls that were delivered to an Agent, 'Failed' calls that were not completed, 'Ok' calls that were completed correctly, and DTMF_X for calls where the user pressed that particular DTMF digit.
The phone handset icon next to the 'Dialer' title will be shown in green if the Dialer is running, and in red if its not. Its a quick way to verify the dialer engine operation. In the above image it shows green, that means the dialer engine is running. If you stop the FOP2 service, the engine will cease to work and the icon will change to red.
Enable / Disable Campaigns
The Campaign list in the dashboard is also used to to enable or disable a campaign by clicking the respective play/pause icons in the left column. Whenever you create a new campaign you will then need to enable/start it from the Dashboard.
Campaigns
This is the section where you can create or administer dialer campaigns. You can create as many campaigns as you need for your operations.

As you can see there are lots of fields to populate, we will break them here one by one for each section:
Info & Mode
This section lets you populate basic campaign information, as:
- Name
- The name for the campaign
- Destination
- Where to send the call to. This is a key component of the campaign configuration. The dialer will originate a call and send it somewhere on your Asterisk dialplan. You define that 'somewhere' on this field. The dialer will pickup some possible destinations automatically from IssabelPBX or similar systems: IVRs, Queues and Custom Destinations. If you want to use the dialer as a mass dialer using the automatic dialer mode (without agents being involved) you can select an IVR as a destination and create an IVR on your system with just some audio files. You can even configure the IVR to let the user select some number to connect to a live agent. If you want to dial calls and handle them via live agents, then select a Queue as a destination. If done, you will be able to chose preview or progressive dialer modes, and calls will only be fired when an agent is available on the specified Queue. You will also see here custom destinations that you can create on Issabel or that will appear automatically when you create particular phone scripts with the FOP2 Scripter.
- Destination AMD:
- The dialer can detect if the call is answered by a machine. In such cases, you might want to send the call to a different destination than if answered by a human. For example, you can play a specific recording for machines, and handle calls to a Queue/Agent if its answered by a person. This way you won't waste agent's time dealing with answering machines.
- Mode:
- This is the dialer mode. If the destination selected is a Queue, you can select 'preview' or 'progressive' modes, where number of simultaneous calls will be limited by the number of agents available in such queue. Preview let agents see the next call information on their FOP2 Agent screen and click a button to dial it, while the progressive mode will fire a call as soon as an agent is free, without requiring that agent intervention to review the call. If you want to automate call handling further, you might want to configure agent phones to auto answer so they do not have to pickup the ringing call. If destination is not a queue, then you can chose the automatic mode where the dialer will fire as many calls simultaneously as configured, without checking for agent availability.
- Initial Leg:
- This setting indicates what party should be dialed first. If you select 'remote', then the external number will be connected first and then bridged/connected to the destination configured previously, either a Queue, an IVR or custom application/script. If you select 'local', then the first connection will be done to the local leg, either the queue, IVR or custom application. Local makes sense if you use queues/agents and want to be sure the dialed party is connected to an agent as soon as the phone is picked up, with no dead airs while the call is being connected. For automatic announcements with no human intervention, local does not make sense as you want the recording to be played when the call is answered, and not before.
- Dial Prefix
- Number to use as prefix before dialing the numbers stored in the dialer database.
Date & Time
Campaigns can be configured to be run at certain times/dates/days.
- Start Date
- The date for the campaign to start. Calls won't be placed before this date is reached.
- End Date
- The date to end the campaign. Calls won't be places after this date is reached.
- Start Hour
- The time of day when the campaign starts on each day. So you can run a campaign that will start at a certain hour every day.
- End Hour
- The time of day to finish the campaign on each day.
- Week Days
- Days of the week on which the campaign will be active. You can select particular days, like Monday to Friday.
Concurrency & Retries
In this section you can configure some modifiers on the campaign about how calls should be handled
- Group by Name
- For multiple phones that share the same name, treat them as one contact. So if one call to a particular number succeeds, then do not dial the rest of the numbers as the 'contact' will be considered done. Useful if you have multiple phones to reach one person and do not want to call them repeatedly if they answer in one of the numbers/phones.
- Dial Attempts
- How many dial attempts to perform if a dial fails
- Concurrent Calls
- Maximum number of concurrent calls to have, only honored when automatic dial mode is configured.
- Retry Minutes
- How many minutes to wait between retries.
Input
The dialer accepts interaction both from the dialed party as well as the agent. You can configure interaction behaviour here:
- Valid DTMF
- Whenever the dialed party press a digit, if listed in the valid DTMF list as specified in this field it will be recorded in the dialer reports. This can be used for simple metrics/stats over calls
- Script
- If you have the FOP2 Scripter installed, you can chose one script to be attached to the campaign, so whenever a call is placed and ringing, the FOP2 agent console will show the script. This in combination with dialer and Asterisk variables is a very powerful tool.
- Dispositions Inbound
- If you have a campaign that has the same name as a system Queue, and the agent receives a call from that queue, when that call ends the system will read the possible call dispositions from this field and present them to the agent so they can tag the call to signal the final outcome for it.
- Dispositions Outbound
- Whenever the dialer originates a call and the call finishes, the agent will be presented with a select box listing all dispositions available on this field.
Call Groups
The dialer needs to be fed with a list of numbers to dial. In order to make management simpler, FOP2 Dialer uses the concept of groups. From this page you can add/edit or import group numbers. You can also add all group numbers to any campaign from this page.
That is why to import or create telephone numbers it is mandatory to fill the Group field for them. The basic fields for a phone entry are:
- Group
- Group name for this particular contact. You can use any logic you want in that name, like 'Miami', 'Sales', 'Prospects', or any other name that will make campaign management simpler. As you will later will have the option to import all group numbers into a particular campaign.
- Name
- The name of the person/contact. This variable will be available in the Preview mode as well as in the Agent script/form if any.
- Number
- Phone number to dial for that contact
- Caller ID
- Caller ID to use when calling that contact (if empty, it can be auto populated when adding group numbers to a campaign as explained in the following section).
- Variables
- A pipe separated list of variable = value pairs to pass to the dialer. This variables will be available for phone or agent scripts.
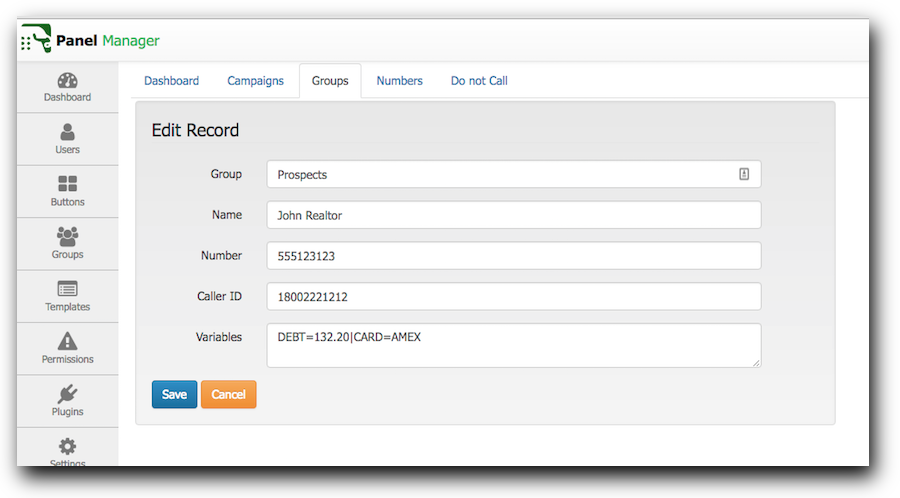
Here is one record in detail, as an example:
Creating multiple records using ranges
It is possible to create a number range directly using the GUI, by filling the number field with two numbers separated by a dash symbol. For example, to create 100 records from numbers 555000 to 555099 just add a new record and in the number field enter:
55000-55099
Once done, you will have 100 new records created for that group in just one step.
Importing numbers via CSV
Another way to import numbers is directly via CSV file import. The CSV file format is as follow
groupname,name,number,clid,vars
Sales,John,5550000,18002223333,VAR=VALUE|VAR2=VALUE2
Sales,Mary,5550001,18002223333,VAR=VALUE|VAR2=VALUE2
Adding numbers to Campaigns
Once you have your groups populated, and some campaign already created, you must add numbers from any of your groups into one of your campaigns. Once they are added to the campaign, that campaign will have actual data to process and start working.
You can add numbers to campaigns from the right side of the page, as shown highlighted here:
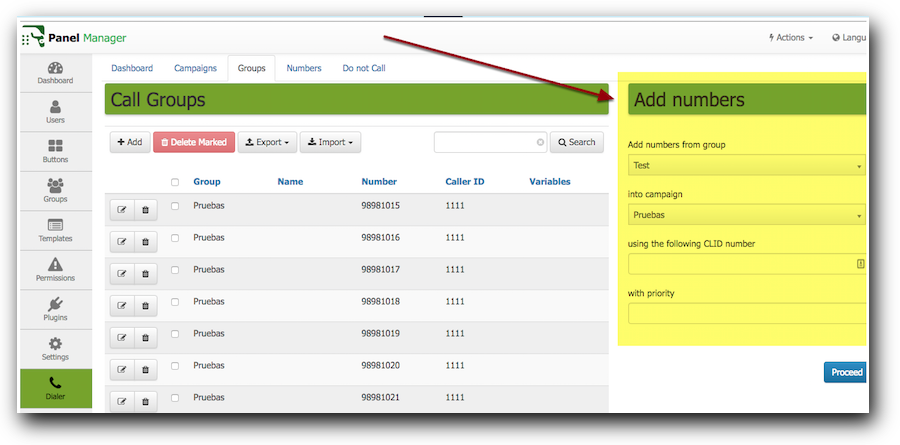
In the above image we can see that we can add all numbers from group 'Test' into the 'Pruebas' campaign.
We can also specify what callerid to use (if the particular record has the callerid field empty, then it will be populated with the one entered during this process. In the other hand, if the individual record already has a callerid set, it will remain the same no matter what you enter in this field.
It is also possible to specify a priority, numbers with higher priority will be tried first.
Once you have selected the Call Group, the Campaign and fill the remaining fields if needed, click the 'Proceed' button to add all those numbers into the campaign. If its running and active, the dialer will start dialing all those numbers at that moment.
Numbers
This section shows the actual numbers assigned to campaigns and its progress. It is a raw list of all numbers, variables and dialer activity and disposition for that call. From here it is also possible to Recycle a selection of numbers (usually done when you want to attempts failed calls more than the configured retry amount).
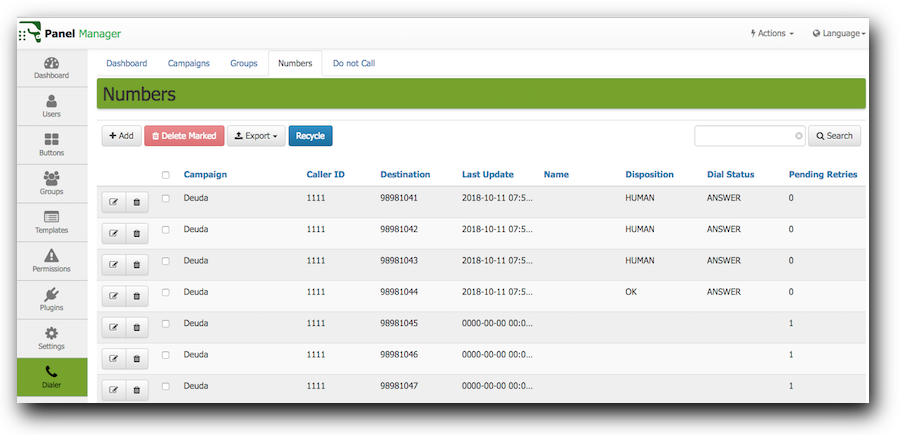
The extra fields you will see here to know about the outcome status are:
- Last Update
- Shows the datetime the dialer last attempted that particular call
- Disposition
- The actual call disposition
- Dial Status
- The dial status as reported by Asterisk Originate command.
- Unique ID
- The uniqueid of the call
- Dial Attempts
- The number of attempts this record was dialed
- Agent
- Agent that took the call (in case that the campaign has a Queue configured as its destination)
Dispositions
Dispositions codes are descriptions of the final outcome of a call. These codes are a simple way for agents to label inbound or outbound calls and help keep the entire team on the same page. The code will be applied to the call log for statistic purposes. From this page you can add/edit/remove possible dispositions. Then you will be able to select what dispositions to enable when editing a campaign.
Do not call list
On this section it is possible to add numbers that should never be added to any campaign. Any number listed here won't be added from the Groups section, it will be skipped.